Critical Procedure - Trauma (larger bore) chest tube insertion
Back to Critical Procedures - Index page
For all procedures, ask yourself, 'does this need to be done 'now vs later'? And should this be done by 'me vs someone else?' Very often the answers will be 'now' and 'me' - so read on!
Trauma (larger bore) chest tube insertion
Description
 Insertion of a large bore chest tube in trauma:
Clear thought re pros and cons, is important, before we insert a chest tube. How much do we suspect a pneumo or haemothorax? How sick is the patient? Can we perform an USS? Can we wait to try to be clearer about the diagnosis? .....all weighed against...if we think a pneumo or haemothorax is markedly affecting the patient (extreme dyspnoea/tachypnoea, reduced ventilation (hyperexpanded, reduced breath sounds), hypotension, deteriorating in front of us) then we we need to act now.
In the absence of haemodynamic or significant respiratory compromise with clear signs we can pause, observe and attempt to clarify the diagnosis with USS, CXR or clinical findings...but watch for that progression.
Indications
Traumatic pneumo and/or haemothorax - or strong suspicion of in the presence of respiratory or haemodynamic instability - or traumatic arrest
Contraindications
None, if the indications are clear.
Equipment
Safety glasses/eye shield. Mask. Sterile gloves.
Chlorhexidine skin prep.
28F, or larger, chest tube
Large Kelly's forceps x3 - straight or curved
Pleurevac/Atrium or other collection device with a one way seal
Scalpel
Large silk (or other strong) suture
Lidocaine - 20 mls
Gauze or dressing.
Tegaderm or pink tape dressing.
Procedure
- raise arm above head
- don face mask, eye shield and sterile gloves
- load chest tube onto Kelly's forceps using the side hole close ot the end of the tube
- consider putting a Kelly's on the connection end of the chest tube to keep it closed until it is connected to the drainage system
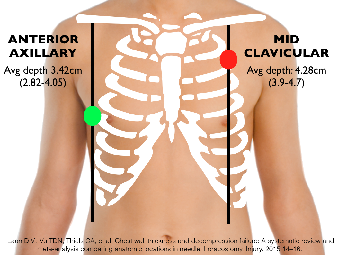
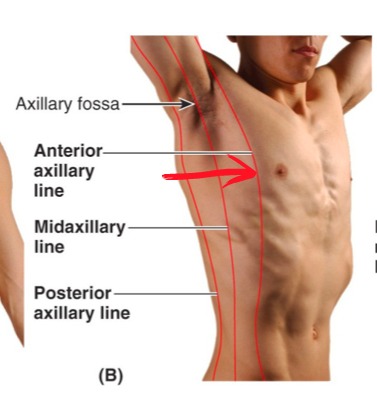
- 4th or 5th intercostal space - anterior axillary line - just above the rib
- quick skin prep, infiltrate lots of lidocaine local anaesthetic down to pleura
- incise the skin just above the 5th or 6th rib, about 1-1.5" in the line of the ribs (a common error is to make this incision too small)
- put your finger in the hole ONLY IF THERE ARE NO RIB FRACTURES THOUGHT TO BE CLOSE
- use Kelly forceps to blunt dissect (this is hard work - push and then open the forceps...and keep repeating) down alongside your finger to the pleura, being careful not to push so hard as to overshoot into the chest when you pop through (guard yourself by supporting/holding the Kellys at the chest wall with your non-dominant hand)
- perform a finger sweep to confirm that you are into the chest and to obtain other information (can you feel the lung? is there blood? etc)
- IF THERE IS A CHANCE OF A RIB FRACTURE BEING CLOSE then blunt dissect without your finger in the hole, when you 'pop through' the pleura, hold the Kelly forceps in place, introduce the chest tube (loaded on a second set of Kelly forceps, along the forceps that are in place (this keeps your path into the chest cavity)
- pass the tube towards the superior or inferior aspects of the chest direction ( do NOT pass horizontally - can lodge in the horizontal fissure and become occluded) until the last side hole is about 2 cm inside the chest cavity (the side holes MUST be well inside the chest so as not to leak to the exterior air)
- connect to the drainage system that your facility uses - tape the connections with pink tape (NB most (but not all) drainage systems require water to be added to create the underwater seal)
- ensure that there is initial 'bubbling' and ongoing swinging in the fluid window of the drainage system (will not see swinging the same if patient is on positive pressure ventilation)
- suture in place - push the tube to one end of the incision, put a large bite suture (might need more than one) to close the remainder of the skin on the one side of the tube. Anchor a second suture to the skin and 'lace around the tube tying a not on each side each time until it feels secure.
- apply a gauze dressing around the tube (putting a cut in a few 2x2 gauze pads allows the gauze to surround the tube (paraffin gauze can be used next to the skin but is not necessary)
- apply a Tegaderm/Opsite or pink tape dressing over the gauze
- keep reassessing for bubbling/swinging, check for subcutaneous emphysema, review vital signs
- order chest imaging
Potential pitfalls
Getting sprayed with aerosolised blood if there is a tension pneumothorax (wear PPE!)
Rib fracture at site - can cut finger if inserted into track/chest
Haemorrhage.
Not entering the chsst cavity with the tube - inserting subcutaneously by mistake
Failure to confirm correct siting with bubbling/swinging, imaging and clinical response
"Plan B"
In traumatic arrest - replace volume, deal with hypoxia - but if not better after chest tube insertion, consider attempt at pericardiocentesis.
Back to Critical Procedures - Index page
Last modified: Thursday, 19 May 2022, 12:19 PM